Wednesday, July 29, 2009

Zinmag Tribune Blogger Template


demo download


Configure the First Header Navigation Bar


Access into ‘Layout’ and under the ‘Edit HTML’ tab, press [CTRL+F3] to find the code below and edit it with corresponding item.


<li><a href=’YOUR-LINK-HERE’ title=’YOUR-LINK-TITLE’>YOUR-LINK-TITLE</a></li>


Configure the Subscription Section on the top of the blog


Access into ‘Layout’ and under the ‘Edit HTML’ tab, press [CTRL+F3] to find the code below and edit it with corresponding item.


<a href=’YOUR-POST-RSS-LINK-HERE’>

<a href=’YOUR-COMMENT-RSS-LINK-HERE’>

<a href=’RSS-EMAIL-SUBSCRIPTION-LINK-HERE’>


If you are using the Feedburner, the RSS email subscription link should look like this:


http://feedburner.google.com/fb/a/mailverify?uri=FalconHive&amp;loc=en_US


Configure the Second Header Navigation Bar


Access into ‘Layout’ and under the ‘Edit HTML’ tab, press [CTRL+F3] to find the code below and edit it with corresponding item.


<li><a href=’YOUR-LINK-HERE’ title=’YOUR-LINK-TITLE’>YOUR-LINK-TITLE</a></li>


Configure the Featured Content Scroller on the top of the page


Access into ‘Layout’ and under the ‘Edit HTML’ tab, check the ‘Expand Widget Templates’, then press [CTRL+F3] to find the code below and edit it with corresponding item.


<a href=’POST-LINK-HERE’ title=’LINK-TITLE-HERE’><img src=’IMAGE-LINK-HERE’width=’60′ height=’40′ alt=”/></a> <div class=’fmeta’>POST-DESCRIPTION-HERE</div>


Configure the Featured Content Glider on the top of the main page


Access into ‘Layout’ and under the ‘Edit HTML’ tab, check the ‘Expand Widget Templates’, then press [CTRL+F3] to find the code below and edit it with corresponding item.


<h2><a href=’POST-LINK-HERE’ title=’LINK-TITLE-HERE’>POST-TITLE-HERE</a></h2>


POST-DESCRIPTION-HERE</div>

<a href=’POST-LINK-HERE’ title=’LINK-TITLE-HERE’><img src=’IMAGE-LINK-HERE’ width=’650′ height=’250′ alt=’IMAGE-TITLE-HERE’/></a>


Configure the Minipost Section under the Featured Content Glider


Copy the code below, then access into ‘Layout’ and under the ‘Page Element’, clicks on the ‘Edit’ of the ‘featured-content2′, paste and edit the code with corresponding item.


<div class=’hentry’>

<h2><a href=’POST-LINK-HERE’ title=’LINK-TITLE-HERE’>POST-TITLE-HERE</a></h2>


<div class=’categ’>POST-CATEGORY-HERE</div>

<div class=’minicontent’>

<img src=’IMAGE-LINK-HERE’ width=’120′ height=’80′ alt=”  />

POST-DESCRIPTION-HERE

</div>

</div>

<div class=’minimeta’>POST-DATE-HERE I <a href=’POST-LINK-HERE’>Read the full story</a></div>


How to hide article’s content on the main page


As this template got ‘Read More’ function, you can probably hide some text from being displayed on the main page. Simply copy the highlighted code below, then access into ‘Settings’ and under the ‘Formatting’ tab, paste the code into the ‘Post Template’.


<span class=”fullpost”></span>


On the next time you write an article, you just need to add this line of code to hide the text. For example,After the


Zinmag Tribune Blogger template is a white professional magazine style template authored by Jinsona Design<span class=”fullpost”>This template has rich feature like featured content scroller and featured content glider</span>


Then the main page would show only the ‘Zinmag Tribune Blogger template is a white professional magazine style template authored by Jinsona Design’, while the other text is hid and only can be seen through ‘Read More’ click.


Configure the Featured Video Section on the top of the sidebar


Copy the video’s embed code link, then access into ‘Layout’ and under the ‘Page Element’, clicks on the ‘Edit’ of the ‘featured-video’, paste the code then ‘Save’ to show the video!


Your Youtube video’s embed code link is located below the profile of the video uploader, and you can adjust the <embed>’s width and height inside the code to fix the section size. The recommended size for this featured video section is 310 width and 255 height.


Configure the JavaScript-based Tabber on the sidebar


Copy the code below then access into ‘Layout’ and under the ‘Page Element’ tab, add a HTML/JavaScript gadget into the ‘Popular’ section then paste the code inside the gadget and edit it with corresponding item.


document.write(’<ul style=”text-transform: capitalize;”>’);

var i;


for (i = 0; i < obj.count ; i++)

{

var href = “‘” + obj.value.items[i].link + “‘”;

var item = “<li>” + “<a href=” + href + “>” + obj.value.items[i].title + “</a> </li>”;


document.write(item);

}

document.write(’</ul>’);

}

</script>

<script src=”http://pipes.yahoo.com/pipes/pipe.run?_render=json&_callback=pipeCallback&_id=a7d3195528df5e96181a3d2712266226&url=http%3A%2F%2FYOUR_BLOG_ADDRESS_HERE_WITHOUT_http://&num=10” type=”text/javascript”></script>


<a href=”http://bloggerstop.net” target=”_blank”><span style=”font-size: xx-small;”>Popular Posts Widget</span></a>


function pipeCallback(obj) {


For the ‘Archive’ section, install Archive gadget inside the section, with the ‘flat list’ as recommended option.


As for the ‘Recent’ section, put your Feed gadget together with your blog’s feed into the section.


Configure the Ads Space on the sidebar


Access into ‘Layout’ and under the ‘Edit HTML’ tab, press [CTRL+F3] to find the code below and edit it with corresponding item.


<li><a href=’ADS-LINK-HERE’ rel=’bookmark’ title=’ADS-TITLE-HERE’><img src=’ADS-IMAGE-HERE’ alt=’IMAGE-TITLE-HERE’/></a></li>


Configure the Footer Navigation Bar


Access into ‘Layout’ and under the ‘Edit HTML’ tab, press [CTRL+F3] to find the code below and edit it with corresponding item.

Labels:

Zinmag Remedy 2.0 Blogger Template


Zinmag Remedy 2.0 is the enhanced version of the Zinmag Remedy Blogger template, which is now SEO fixed and 99% widgetized. Experience the free yet massively improved Remedy and make it your real professional template!
SEO Fixed

As SEO is very important for the serious Blogger, we have rechecked the template and worked out our best to fix every possible SEO issue. We have improved the ‘h tag’ of the Remedy template, and probably rearrange the code to make its structure completely similar to standard template, Minima’s structure.
99% Widgetized

Over the month, we published Blogger template that needs you to setup it in ‘Edit HTML’ section that often cause unpredictable error and is uneasy for beginner. For Remedy 2.0, we have widgetized all the part from the top navigation bar to the bottom tabber section. You can now wipe out all your worries and just customize Remedy in Page Element section!


Improved CSS and Template Structure


We have modified the template’s CSS code to fix some issues like misaligned image in the ads space on the main page. We have also made some modifications on JavaScript/ HTML gadget to make your customization faster and easier.


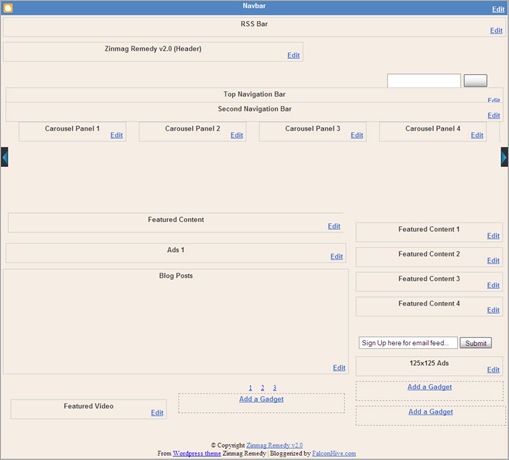
New Layout view


zinmagremedy2


You can observe the demo and download the Zinmag Remedy 2.0 Blogger template.


Set up the RSS Bar


You can customize the RSS bar to your own preferred RSS link. To achieve this, access into ‘Layout’ and under the ‘Page Element’ section, click on the ‘Edit’ of the ‘Top Navigation Bar’ and configure the Link Gadget setup. You can copy and paste the link below into the Link Gadget and edit it to become your post RSS and comment RSS.


Post RSS: YOUR-BLOG-ADDRESS/feeds/posts/default

Comment RSS: YOUR-BLOG-ADDRESS/feeds/comments/default


Set up the Top Navigation Bar


You can customize your header navigation link to your own preferred link. To achieve this, access into ‘Layout’ and under the ‘Page Element’ section, click on the ‘Edit’ of the ‘Top Navigation Bar’ and configure the Link Gadget setup.


Set up the Second Navigation Bar


You can customize your header navigation link to your own preferred link. To achieve this, access into ‘Layout’ and under the ‘Page Element’ section, click on the ‘Edit’ of the ‘Second Navigation Bar’ and configure the Link Gadget setup.


Set up the ‘Carousal Panel’ on the top of the main page


You can see this template got a sliding carousal of featured post image on the top of the page, which can be configured through ‘Carousel Panel’ section. Simply access into ‘Layout’ and under the ‘Page Element’ tab, click on the ‘Edit’ of the ‘Carousel Panel 1′, copy and paste the code below and edit it with corresponding item. You can also use the same step above to configure the Carousel panel 2, 3 and so on.


<a href=’YOUR-POST-LINK’ title=’YOUR-POST-TITLE’><img src=’POST-IMAGE-LINK.jpg’ width=’200′ height=’120′ alt=’#'/></a>


Set up the Featured Content section


There’s also got a wide space under the sliding carousal, which you can access into the space through the ‘Page Element’ section. Simply copy the code below, then access into ‘Layout’ and under the ‘Page Element’, click on the ‘Edit’ of the ‘Featured Content’, paste and edit the code with the corresponding item.


<h2><a href=’YOUR-POST-LINK’ title=’YOUR-POST-TITLE’>YOUR-POST-TITLE</a></h2>


<p>You can put some part of post content here.</p>


Set up the Main Page’s Ads Space


Zinmag Remedy template got an ads space under the top featured content section, and you can setup the ads space with Google Adsense Ad Unit 468×15 Ads. To achieve this, simply access into ‘Layout’ and under the ‘Page Element’ tab, click on the ‘Edit’ of the ‘Ads 1′, copy and paste your Adsense or ads code then ‘Save’ to show the ads.


Hide article’s content on the main page


As this template got ‘Read More’ function, you probably want to hide some text from being displayed on the main page. In fact, you just need some extremely easy step to achieve this. Simply copy the highlighted code below, then access into ‘Settings’ and under the ‘Formatting’ tab, paste the code into the ‘Post Template’.


On the next time you write an article, you just need to add this line of code to hide the text.


Set up the ‘Video of the day’


There’s a video section on the bottom of the mini post section, and you can put favorite Youtube video inside the section by just few simple steps.


To setup your favorite Youtube video, just copy the video’s embed code link, then access into ‘Layout’ and under the ‘Page Element’ tab, click on the ‘Edit’ of the ‘Featured Video’, paste the code then ‘Save’ to show the video!


Your Youtube video’s embed code link is located be

low the profile of the video uploader, and you can adjust the (embed)’s width and height inside the code
to fix the section size. The recommended width and height for the video is 295 and 239.


Set up the Tabber


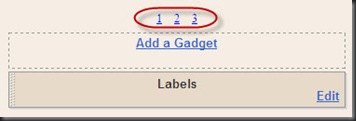
Brownline_tabber

You can probably notice that there’s got gadget with number ‘1′, ‘2′ and ‘3′ in the layout. By clicking the ‘1′, you can actually set up the first part of the tabber with any gadget, same as clicking ‘2′ and ‘3′, which directs you to the setting of second and third part of the tabber.


Set up the ‘Featured Content 1′ section


There’s actually got another featured content section installed on the top of the sidebar.To setup the featured content on the sidebar, simply copy the code below, then access into ‘Layout’ and under the ‘Page Element’ tab, click on the ‘Edit’ of the ‘Featured Content 1′, paste and edit the code with the corresponding item. You can also use the same step above to configure the featured content 2, 3 and so on.


<img src=’YOUR-IMAGE-LINK’ width=’100′ height=’60′ alt=”/>

<div class=’fcats’><a href=’YOUR-CATEGORY-LINK’ title=’YOUR-CATEGORY-TITLE rel=’category’>YOUR-CATEGORY-TITLE-HERE</a> </div>

<h2><a href=’YOUR-POST-LINK’ title=’YOUR-POST-TITLE-HERE’>YOUR-POST-TITLE</a></h2>

<div class=’auth’> Posted by Author </div>


<div class=’fmeta’> POST-DATE |

<a href=’YOUR-POST-LINK’ title=’Comment on YOUR-POST-TITLE’>ADD COMMENTS</a></div>


Set up the 125×125 Ads


You can change the 125×125 ads image to your own ads image. To achieve this, simply copy the code below and access into ‘Layout’ and under ‘Page Element’ tab, click on the ‘Edit’ of the ‘125×125 Ads’, paste and edit the code with corresponding item.


<a href=’YOUR-TARGETED-LINK’ rel=’bookmark’ title=’#'><img src=’YOUR-IMAGE-LINK’ alt=’#'/></a>


Set up the Email Subscribe button


You can personalize the email subscribe button to your own personal RSS. To get this done, you have to sign up the Google Feedburner account first to get the Email Subscription link. Your email subscription link should looks like the code below:


http://feedburner.google.com/fb/a/mailverify?uri=ZinmagRemedyV20&loc=en_US


Simply copy the subscription link, access into ‘Layout’ and under the ‘Edit HTML’ tab, press [CTRL+F3] to find the code below and edit it with corresponding item.


<form action=’EMAIL-SUBSCRIPTION-LINK-HERE’ method=’post’ target=’popupwindow’>

<input name=’url’ type=’hidden’ value=’EMAIL-SUBSCRIPTION-LINK-HERE’/>


We care about Author


Zinmag Remedy 2.0 comes under a Creative Common License. This means it is free to use on your blog as long as the credit link in the footer is kept intact. Jinsona Design has really put so much effort on designing this template, so if possible you can pay a visit to the site and leave a thankful comment!


A huge breakthrough, and hope for more improvement


Zinmag Remedy 2.0 is undeniably a breakthrough for my coding skill. I want to express my thanks to many professional template maker like Arthur who shares to me precious experience about the SEO, and Agus Mu who shares many suggestion to improve this template.


While I am still improving myself to make better Blogger template, I hope to hear more report and suggestion from you to improve this template, please always remember that only with you Blogger can be better, thanks!


Grab our latest Blogger templates!


You are deserved to be the fastest being to get our latest Blogger templates. Just simply click on this cute green ‘RSS‘ word or subscribe it by email then you are ready to grab our Blogger templates!


demo download


Labels:

Tuesday, July 28, 2009

Forex Press Blogger Template


If I see green color, my mind directly connect with nature, tree and leaf. :). But this green is difference. it is related with money. hahahah...
In my country, money is not only in green but also in red, blue, and brown.
Again, hahahah.... Green is just metaphor right....!! just kidding men, just kidding....:).

By the way, as new comer, I would like to Introduce Forex Press V. 1.0 Blogger Template that I have converted from Word Press for you.

This template has been tested in :

1. Internet Explorer 6. (new versions will view it best, like IE 8)
2. Mozilla Firefox 2.xx (new versions will view it best, like Firefox 3.xx)
3. Opera 9.0 (new versions will view best)

After Downloading, please leave a comment below..... yeah... ...........:)

demo download


Labels:

Zinmag Futura Blogger Template


This day, I would like to launch Zinmag Futura Blogger Template. This template is originally from WP Theme and made by Jinsona. Then I convert it to Blogger Tempate.

Thanks dude... for creating a very nice WP Themes.

Overview:
Name : Blogger Template Zinmag Futura
Original From : Zinmag Futura WP THEME
Original Author : Jinsona Designs
Converted to blogger by : Cahaya Biru

Template Feature :
1. Magazine Style with inline posting
2. Auto readmore included
3. Glide Content with up-down toggler
4. Slider with right-left toggler
5. Featured Post
6. Nice Chocolate Twitter Header
7. Post Focus included**
8. Menu

**Post Focus, its mean that you will not see the Slide, Glide, and Featured section when you enter the single post article. I have another name of it "You can see me in front, but not in behind"... heheheh :D

Any theory about it?? tell me...

Clearly, The Slide, Glide, and Featured secton is all gone when you enter the single post article. Isn't it very nice dude .... :)

demo download


Labels:

The Four Column 02 Template


Am glad to have another good four column template on the blog, searching for them is rather difficult but Gosu Blogger just gave us a new one.

The O2 2.0 is originally a three column blogger template but now we have an additional column added to it on the left hand side.

The rest of this template remains the same except the fact that the post date has been removed by Gosu because of an error in the template but that doesn't stop it from being a gorgeous template.

There is just one little issue with the template, in Opera the extreme right hand sidebar header sticks out of the body, it does not look like an error actually it kind of looks quite neat, like an additional feature.

The dominant colours of this template are white and blue, and has a lot of sections even when it was in the three column version. Now you have another full section to add more functions to your blog.

download


Labels:

PassionDuo Blue Blogger Template


The Passion Duo template has been originally designed by Daily Blog Tips and converted to blogger by eBlog Templates, who has recently pissed me off by asking its users to register. But I managed to get all these templates from other sites, I am pretty sure hes gonna loose some users with his latest move.
PassionDuo Blue Template
The PassionDuo template is available in three different colors, Blue, Red and Green, apart from that its a very neat template with equal amount of partitions between every segment.

Now lets dissect the blog template bit by bit, starting off with the big bold header title, on the top left with the description under it, which has place only for one short sentence. The right holds enough space for a leader board ad, this position is suppose to be a very good converter actually.
PassionDuo Red Template
Under that is the navigational menu that runs in a strip under the header of the blog, which has a css hover assigned to it. On the far right of this template there is a RSS feed button. Theres another leader board space allocated under the header and above the blogs main column. The sidebar hosts ads on the top left, now this blog is for serious money makers.

I really recommend you cut off the sidebar ads, as the blog really look like it has more ads than content. It comes filled up with different widgets the search bar is very neatly done as well, its just a little box with instructions in it.
PassionDuo Green Template
The headline of the post is striking to say the least, extra large as compared to the size of the post font. The post author, labels and comments all find its place under the headline which leaves the end of the post empty. This is what gives the blog an extra feel of neatness. You can download all the three colors from below.


Download the PassionDuo Blue Blogger Template

demo download


Total Download:


Download the PassionDuo Red Blogger Template

download


Total Download:


Download the PassionDuo Green Blogger Template

download


Labels: